Ontrack for Jenkins pipelines
Ontrack collects data about everything which happens in your CI/CD ecosystem.
Such collection of data starts usually with your CI engine. Ontrack itself is agnostic when it comes to the CI engine but this article will focus on getting you started, step by step, with Jenkins.
Installation
I've described in this previous article how to set up both Ontrack and Jenkins so that they can communicate with each other.
In particular, the following points have been described:
- Ontrack has a Jenkins configuration
- Your Jenkins pipelines are configured to use the Ontrack Jenkins Pipeline Library
Pipeline sample
Before we consider its integration with Ontrack, let's first have a Jenkins pipeline without it.
You can find a basic pipeline at https://github.com/nemerosa/blog-202106-ontrack-jenkins-pipeline to get started with. This pipeline is very simple and:
- builds the code
- runs some tests
- scans the code
- publishes a Docker image
This pipeline is very basic and does not do much in reality because the goal is not to actually build and deliver a product but to illustrate how Ontrack can be used to get insights about a pipeline. Artificial sleep steps have been added in order to make the pipeline stages consume some time, so that we can see later how Ontrack collects these times.
In order to integrate this pipeline in your Jenkins instance, the best way might be for you to fork the repository above and to register it as a multibranch pipeline:
- in Jenkins, select New Item
- give it a name, like
blog-202110-ontrack-jenkins-pipelinethen select Multibranch Pipeline - in Branch sources, select GitHub
- enter your credentials and the URL to the fork of the sample repository
- leave all other options to their default values and click Save
There are other ways to integrate this pipeline into your Jenkins instance, like using GitHub organizations, etc. Feel free to choose the method you are the most familiar with.
You can now run your pipeline and checks that it completes successfully.
Setting up your branch
Before anything else, we have to declare the Ontrack Jenkins pipeline library into your pipeline. As the first line of your Jenkinsfile, add:
@Library("ontrack-jenkins-cli-pipeline@v1") _Here, we're using v1 as the version of the pipeline library to be used, but in a production environment, I'd recommend to use a fixed version, as listed in https://github.com/nemerosa/ontrack-jenkins-cli-pipeline/releasesThen, let's add a Setup stage where we will connect to Ontrack and make sure your pipeline is registered in Ontrack. This stage can be added just before the Build stage:
// ...
stages {
    stage("Setup") {
        steps {
            ontrackCliSetup()
        }
    }
    stage("Build") {
        // ...
    }
}
When your pipeline runs with those changes, the blog-202110-ontrack-jenkins-pipeline project appears in Ontrack:
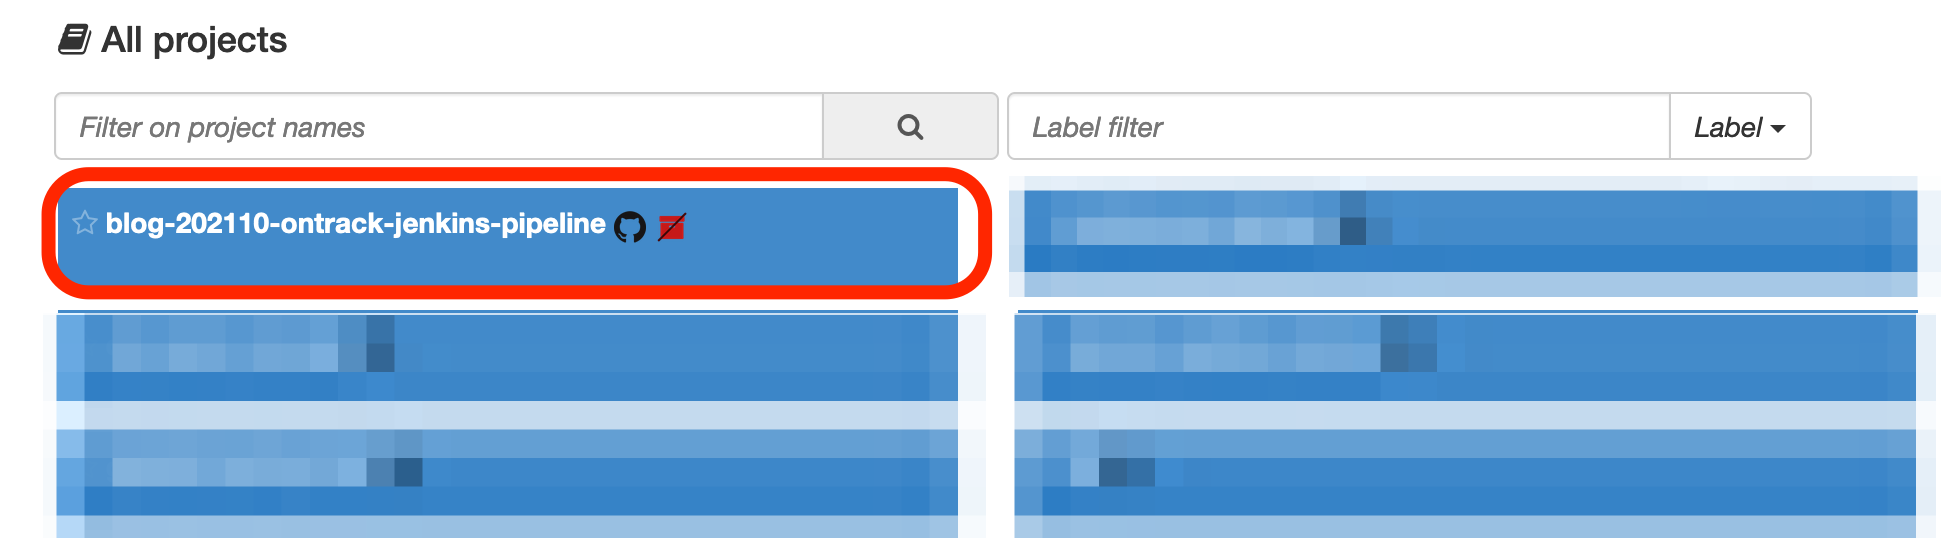
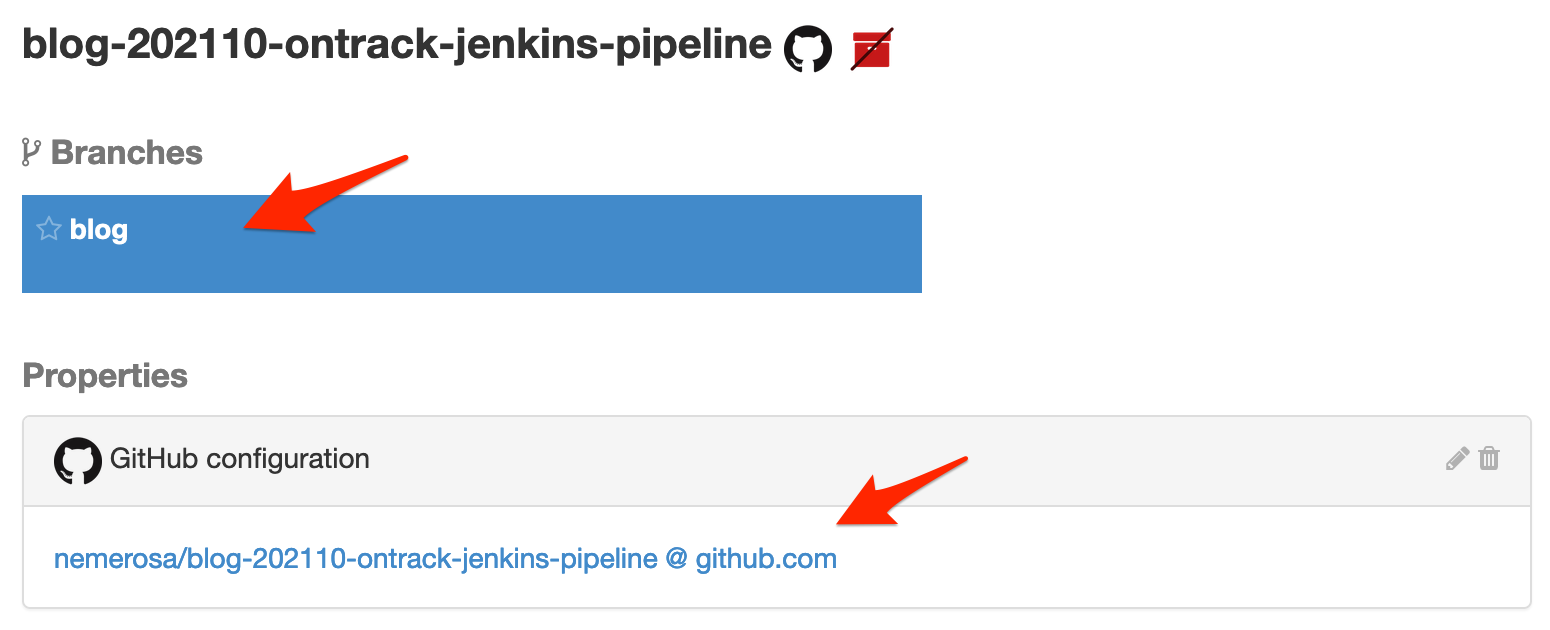
The branch you're working on has been created (I'm working here on a branch named blog) and the project has been linked to its GitHub repository:
Do you see the red stricken package icon close to the project name? It just means that the project is not registered yet in the SCM Catalog, but after a couple of hours, when some background jobs have run in Ontrack, this icon will disappear.
When clicking on the branch, we see that it's been associated with the corresponding Git branch and that builds will be linked to Git using a commit property:

See the ontrackCliSetup documentation for all available configuration options.
Creating a build
Ontrack has the notion of a build - an entity that corresponds more or less to a build or pipeline run in most CI systems.
The first thing to do after the setup is to create this build from the pipeline. Here, we'll do something a bit fancy because we'll attach a release label to the Ontrack build. In a real pipeline, this would be typically the version of the package/library/application that you're building.
Just after ontrackCliSetup let's compute this "version" and let's use it to create the Ontrack build:
ontrackCliSetup()
ontrackCliBuild(release: "v${BUILD_NUMBER}")
Let your pipeline run. In Ontrack, on the branch page, you should now see your build and its label:
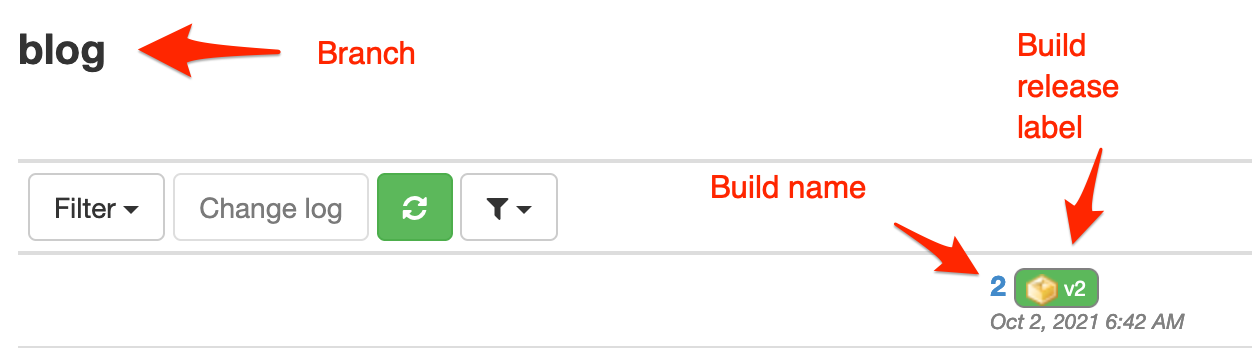
A bit of explanation here:
- the name of the build (kind of its identifier) is set by default to the build number in Jenkins. Use the
nameparameter to override this if need be - the release label -
v2in our example - is given by thereleaseparameter
See the ontrackCliBuild documentation about more options to create an Ontrack build.
Validating the build
Once a build has been created in your pipeline, it will be tested, deployed, scanned, etc. Each step you perform to increase the quality of your delivery is marked in Ontrack as a validation run (or validation) linked to a validation stamp.
A validation stamp is associated with a title and optionally a description and has to be defined beforehand. Since this can be cumbersome to do this manually, you can do this as code within your pipeline.
In a larger setup, we can also define predefined validation stamps and theontrackCliSetupcan use theautoValidationStampsparameter to reuse these predefined validation stamps. This avoids a lot of configuration. This might be the subject of a next article. For now, we'll stick with an explicit validation.
Validation stamps setup
A good practice is to associate each stage of your Jenkins pipeline with an Ontrack validation stamp.
In our pipeline, we have the following stages:
- Build
- Test
- Scans
- Publication
Let's create the corresponding validation stamps by adding some parameters to the existing ontrackCliSetup step:
ontrackCliSetup(
validations: [
[
name: "Build",
],
[
name: "Test",
],
[
name: "Scans",
],
[
name: "Publication",
],
],
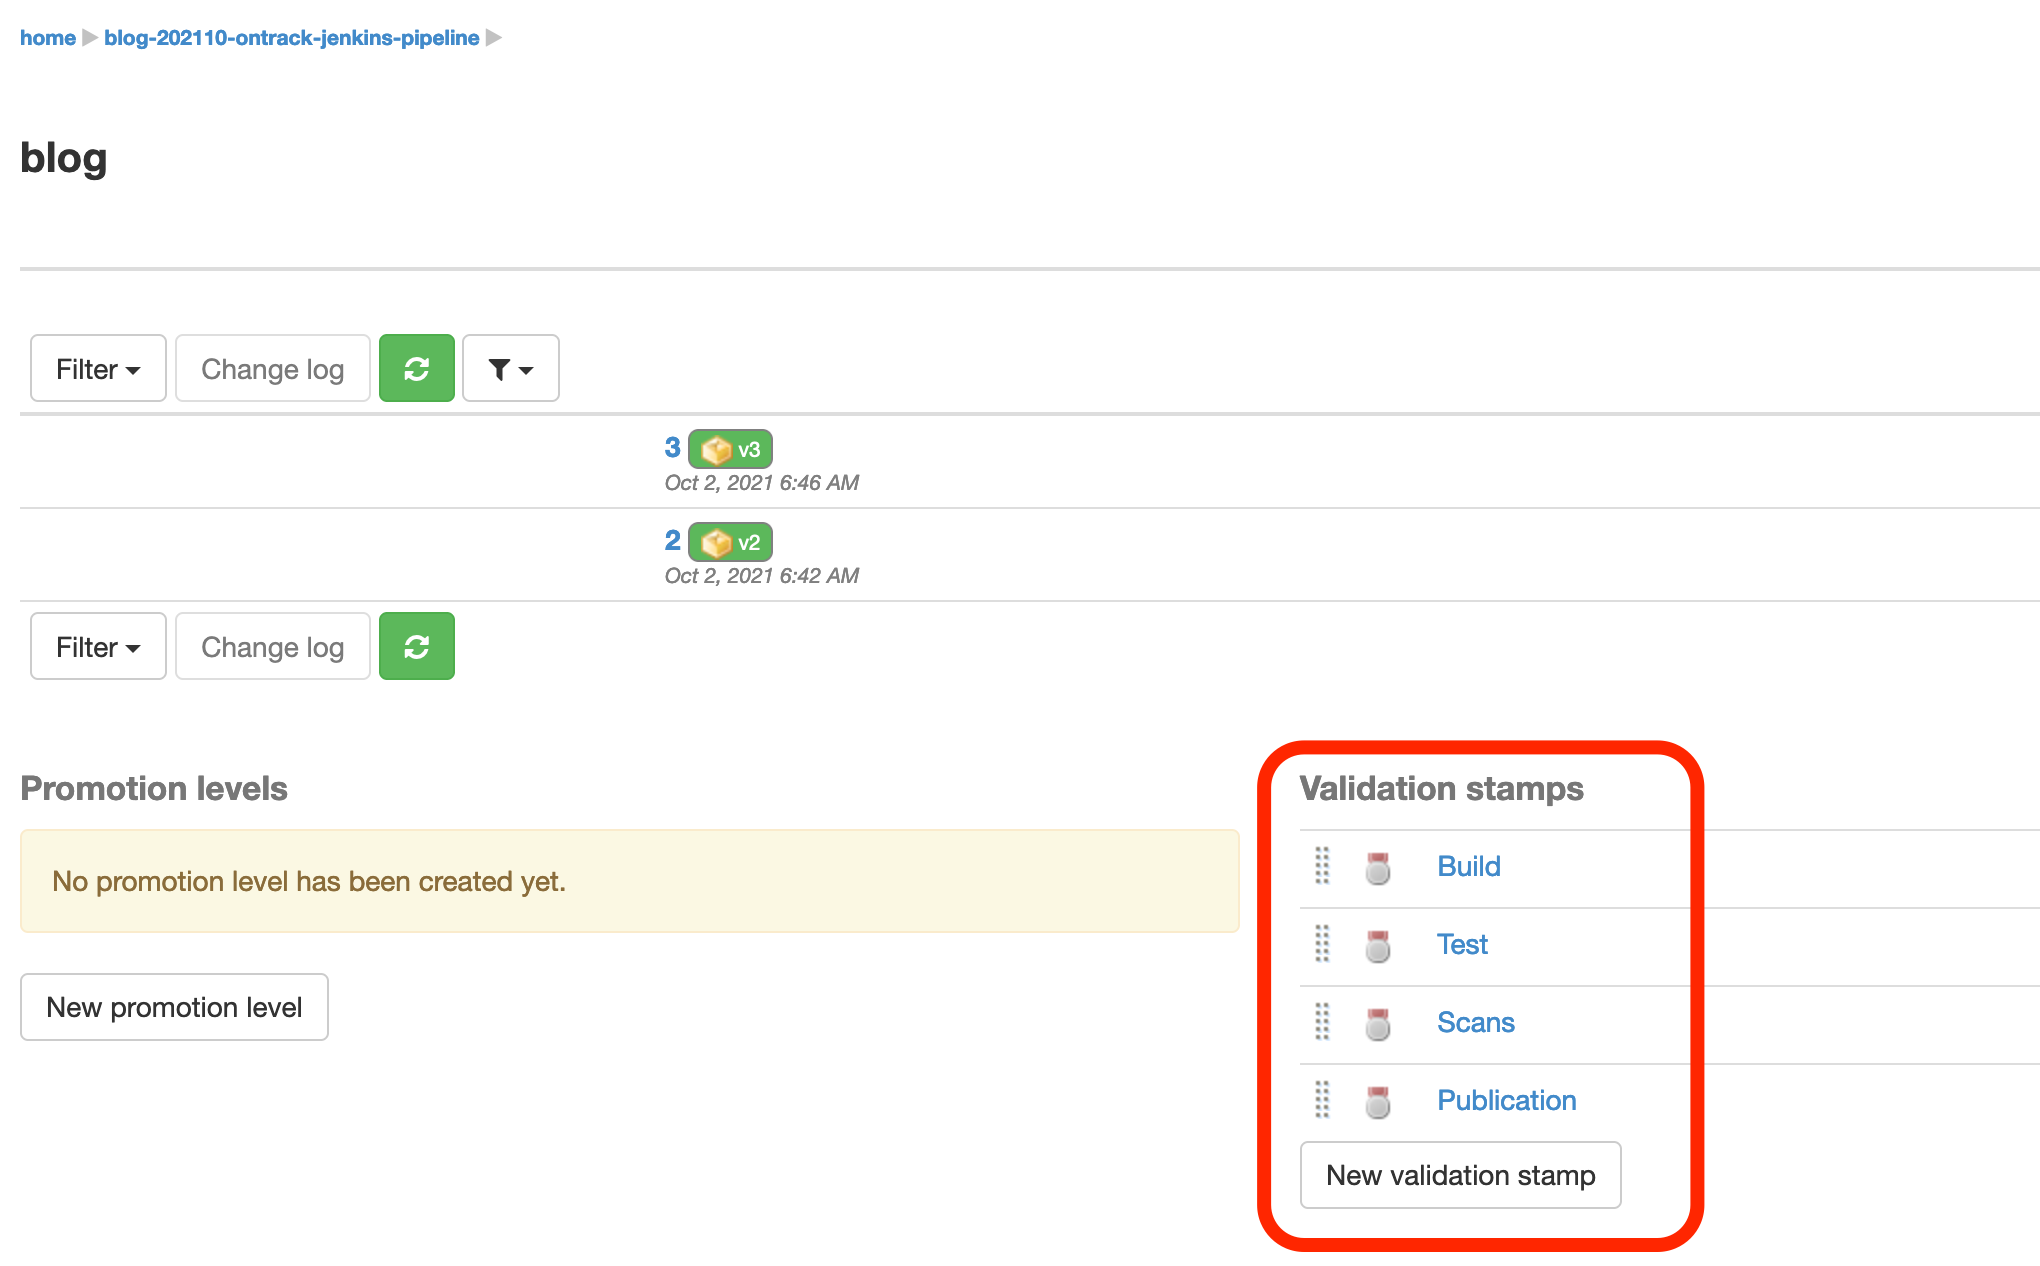
)Let your pipeline run, and you can now see that your branch has these four validation stamps being defined:
These validation stamps look a bit sad. Using the UI, you can set descriptions and icons. Note that this will be the subject of a next article, about scaling up the usage of validations & promotions in Ontrack. Stay tuned!
Simple validation
Now that the validation stamps are defined, you can start using them for creating validation runs from your pipeline.
A validation run links a build to a validation stamp, and has the following attributes:
- its status like Passed or Failed (but others are available)
- its duration
- where it comes from (the Jenkins job)
- how it was triggered (the event leading to the launch of the Jenkins job)
- etc.
Luckily, the ontrackCliValidate does the job for you. Let's create the Publication validation run for now:
stage("Publication") {
  steps {
    echo "Publishes the Docker image"
    sleep 3
  }
  post {
    always {
      ontrackCliValidate(stamp: 'Publication')
    }
  }
}
Important: the creation of validation runs should always be done in thepostblock of a stage and in thealwayscondition. You don't usually need to use thesuccessorfailurecondition: the Ontrack Jenkins library will compute the status of your stage automatically.
Let your pipeline run, and we now see that a validation run has been created for your last build:
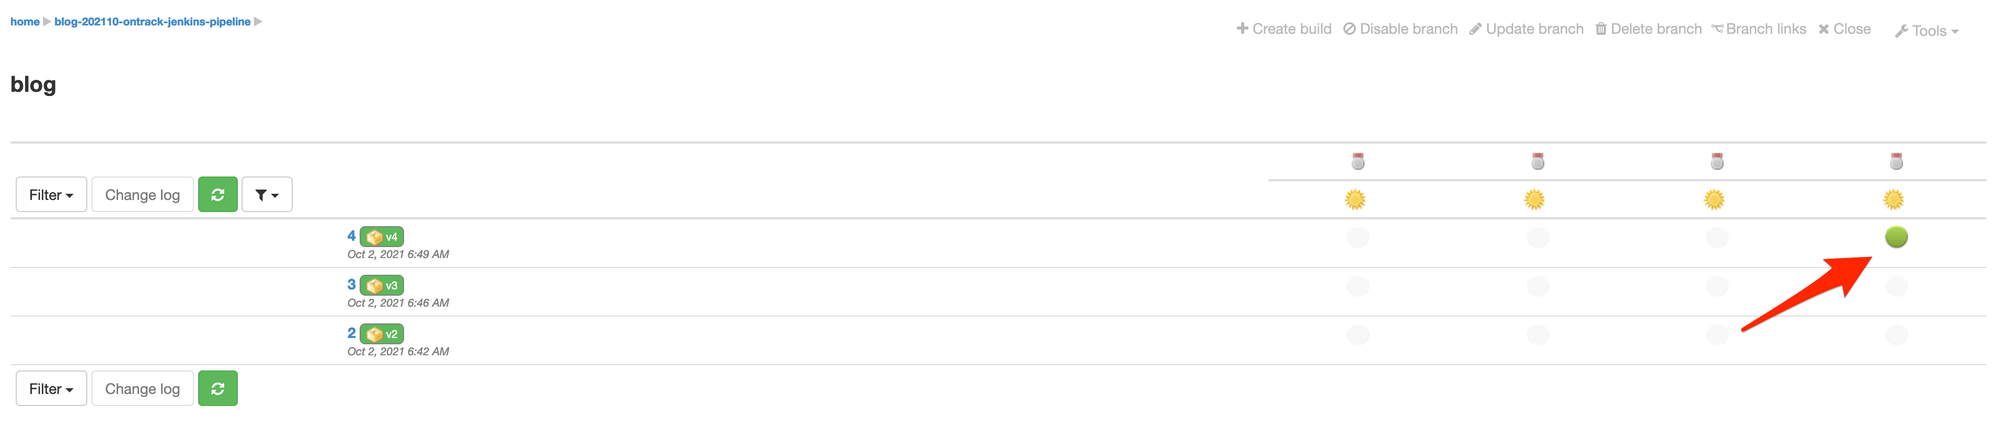
The indicator for this validation run is green, meaning it's passed. You can click on it to get more details:

You can see:
- the last status of this run
- the timestamp of this run
- the source of this run (in your case, a link to the Jenkins job)
- the duration of this run
You can try the different links (the run link, the validation stamp icon, and the build name on the branch page, etc.). You'll have access to different views of the same data. Use the one you feel the most comfortable with.
If a validation runs several times against the same build, several runs will appear in this dialog box.
Making the validation fail
Just for the sake of showing how this looks, let's make the Publication fail. Just add an error step:
stage("Publication") {
  steps {
    echo "Publishes the Docker image"
    error "Publication just failed"     // <-- add this line
    sleep 3
  }
  post {
    always {
      ontrackCliValidate(stamp: 'Publication')
    }
  }
}
When the pipeline is completed, the validation run is indicated as Failed:
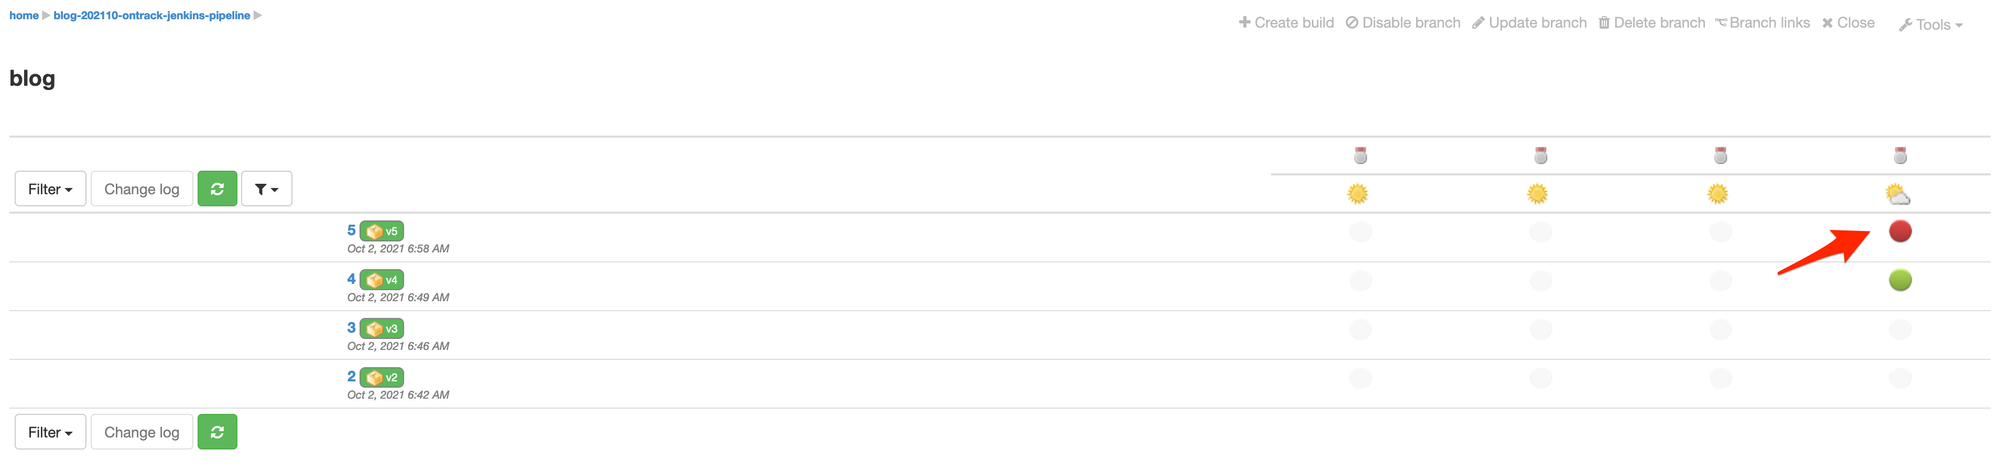
Now, click on the validation stamp icon and you can see a different view, by looking at all the runs for all the builds for this validation stamp:

Now, revert the change in your Jenkinsfile (remove the error line) and commit and push. After a moment, the Publication validation run is Passed again:

Validation with test data
By default, a validation run is kind of binary: either Passed or Failed. But can have more information associated with a validation run. For example, when running tests, we might want to send to Ontrack the number of tests that were passed, skipped, or failed.
If you're using JUnit in your build (but other test engines can be supported as well), it's as simple as using the ontrackCliValidateTests step. Let's add this in our Build stage, together with adapting the setup so that the Build validation stamp is configured for tests:
After the pipeline has run, the validation run appears still passed in the main view, on the branch page:
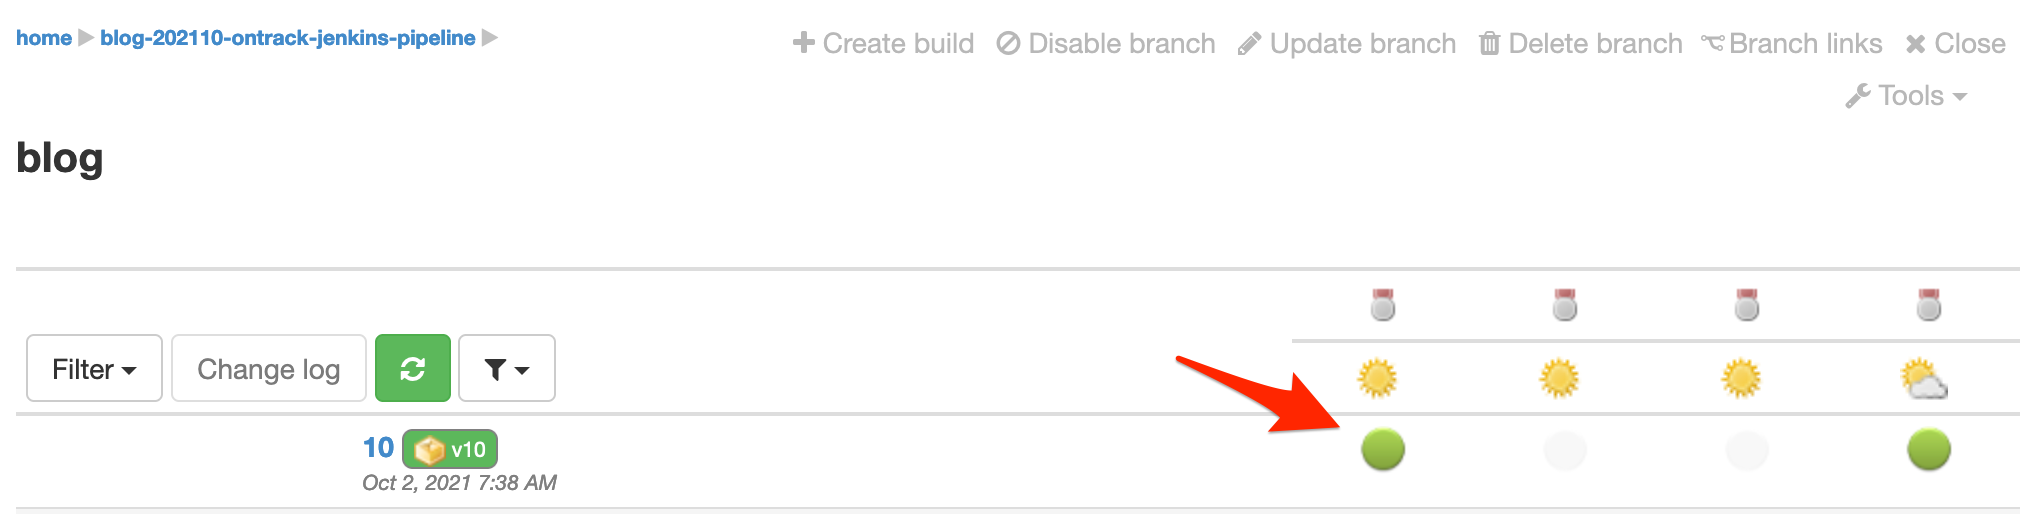
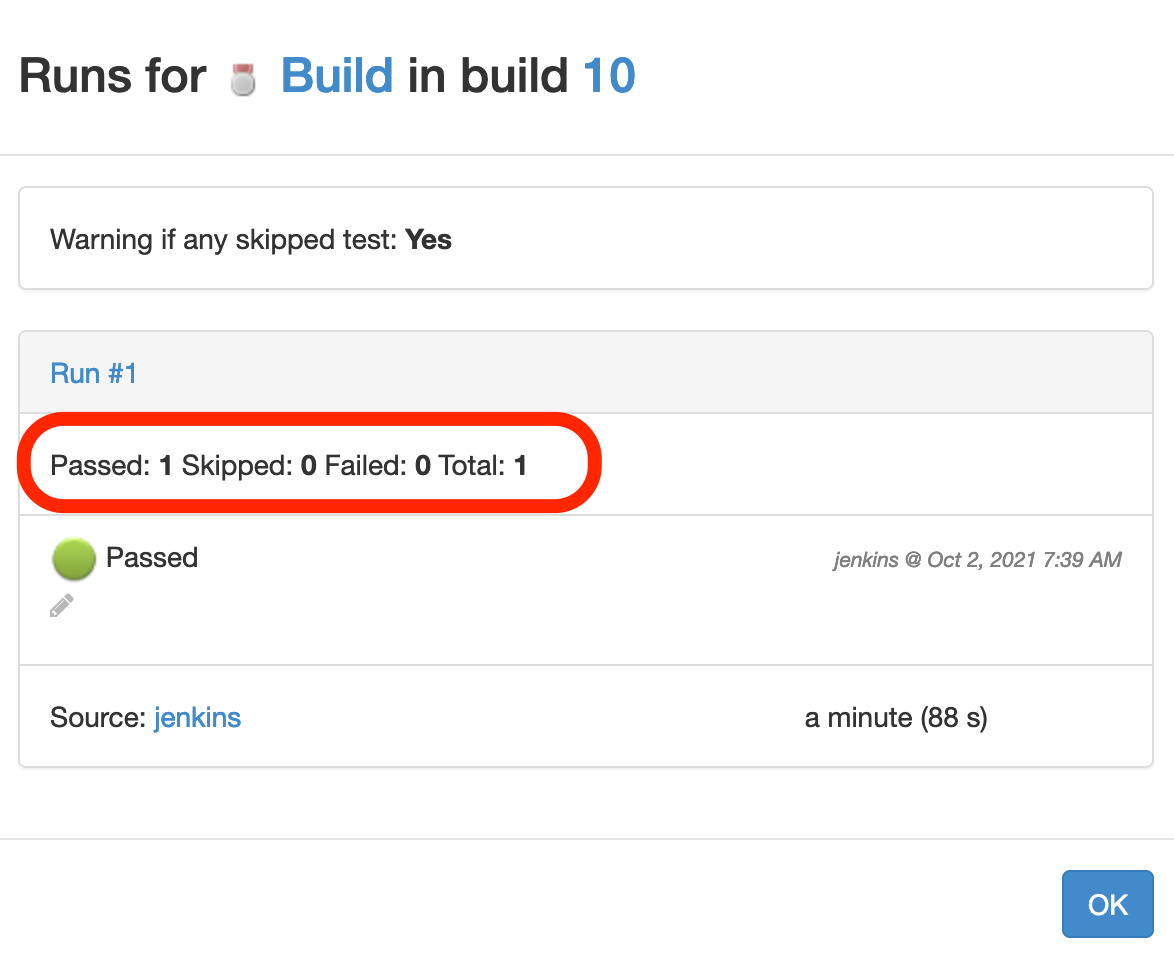
When clicking on the validation run, you can see the statistics about the tests:
stage("Setup") {
  steps {
    ontrackCliSetup(
      validations: [
        [
          name: "Build",
          tests: [                  // <-- Configuration
            warningIfSkipped: true,
          ],
        ],
        // ...
// ...
stage("Build") {
  steps {
    echo "Compiling and running unit tests"
    sh './gradlew build'
    echo "Building the Docker image"
    sleep 2
  }
  post {
    always {
      ontrackCliValidateTests(stamp: 'Build') // <-- The validation
    }
  }
}
Validation with other types of data
So far, we have seen simple validations or validations which are associated with some test results.
Other validation data types are available out of the box:
- CHML (Critical, High, Medium, Low) - typically used after a quality of security scan to report on detected issues and their severity
- Percentage
- Generic Metrics
- See https://github.com/nemerosa/ontrack-jenkins-cli-pipeline for the different types being supported and their configuration.
As an example, let's just add arbitrary CHML data in the Scans stage:
stage("Setup") {
  steps {
    ontrackCliSetup(
      validations: [
        [
          name: "Scans",
          chml: [                  // (1)
            failed: [
              level: 'CRITICAL',
              value: 1,
            ],
            warning: [
              level: 'HIGH',
              value: 1,
            ]
          ],
        ],
        // ...
// ...
stage("Scans") {
  // ...
  post {
    always {
      ontrackCliValidateCHML(      // (2)
        stamp: 'Scans',
        critical: 0,
        high: 34,
      )
    }
  }
}
A bit of explanation:
- (1) - we configure the
Scansvalidation stamp to fail the validation if the number of critical issues is greater or equal than 1, and to be marked as a warning if the number of high severity issues is greater or equal than 1. - (2) we set the date for this validation. Here, we use arbitrary numbers, but in a real environment, you'd get these numbers from report files or API calls. Since we have 0 critical issues and more than 1 for the high severity ones, we expect the validation run to be marked as a warning
Let's run the pipeline and now the Scans validation run is shown as follows:
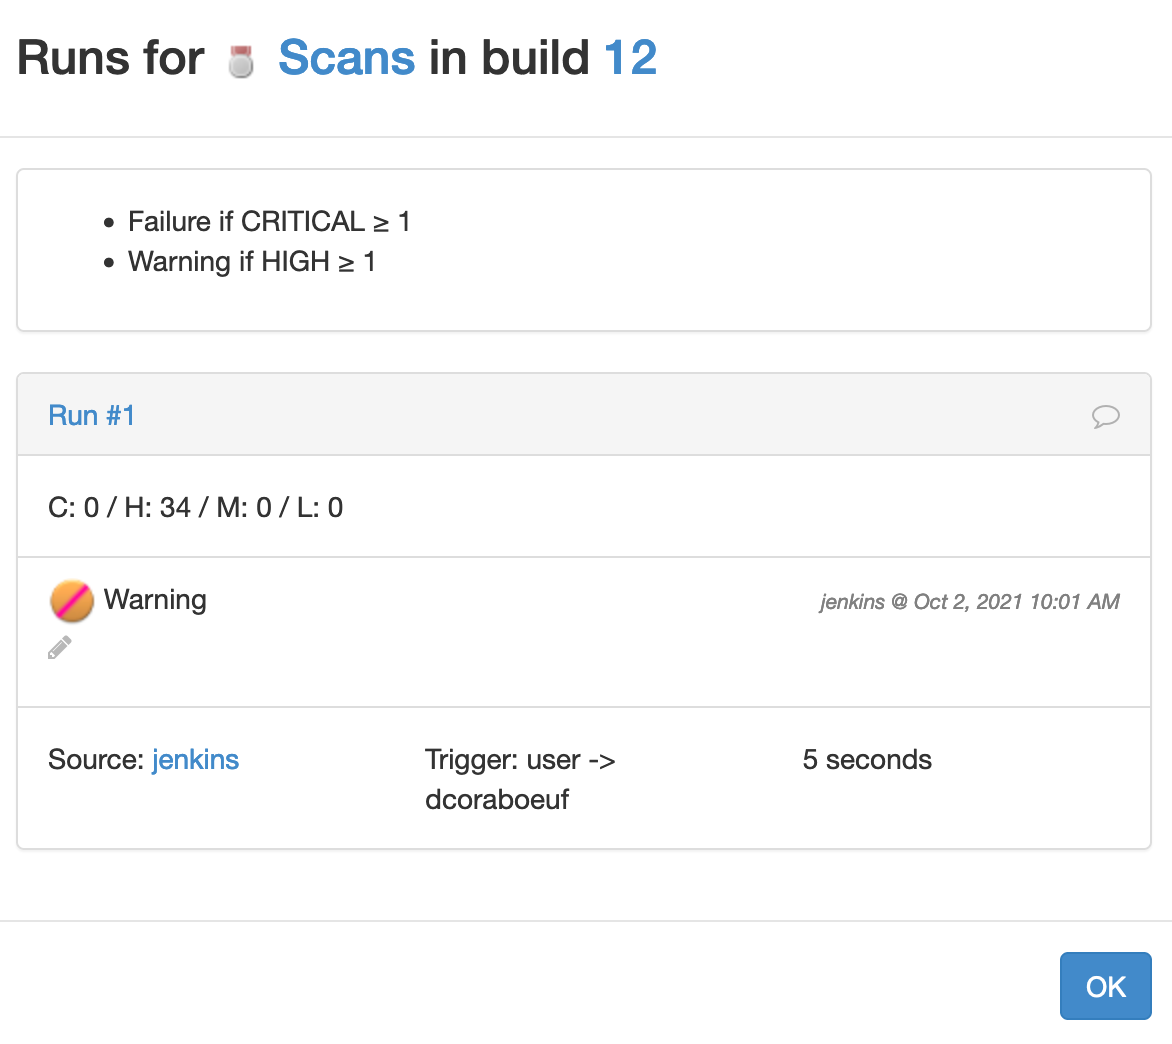
Because the number of high severity issues is greater or equal to 1, the run is shown as a warning.
Auto promotions
In the previous section, we've seen how to associate validation runs with a build, together with some data.
Validations are a way to communicate what has been done on a build, like some types of tests, scans, etc. In a large pipeline, the number of these validations can be very important and it becomes cumbersome to designate the quality of a build by using all its validations.
Instead, Ontrack uses the concept of promotion, which abstracts the level of quality of a given build, linking a conventional name to a set of quality gates represented by validations.
The way these promotions are named and how they are defined may vary a lot from one organization to another. What I found worked well is to really abstract these promotion names and give them metal names. For example:
- Iron - unit tests & packaging are OK
- Bronze - integration tests are OK
- Silver - end-to-end tests are OK
- Gold - quality, security & performance tests are OK
Again, that's just an example.
In our sample pipeline, we'll use a fictional setup: we'll say that our build has reached the Gold promotion if and only if the Build and the Scans validations are passed.
Once again, we define this setup as code in the Jenkinsfile:
stage("Setup") {
  steps {
    ontrackCliSetup(
      validations: [
        // ...
      ],
      promotions: [
        Gold: [
          validations: [
            "Build",
            "Scans",
          ],
        ],
      ],
    )
    // ...
  }
}
On the next pipeline run, after the Builds and Scans validations have run, the Gold promotion is... not granted but is defined:
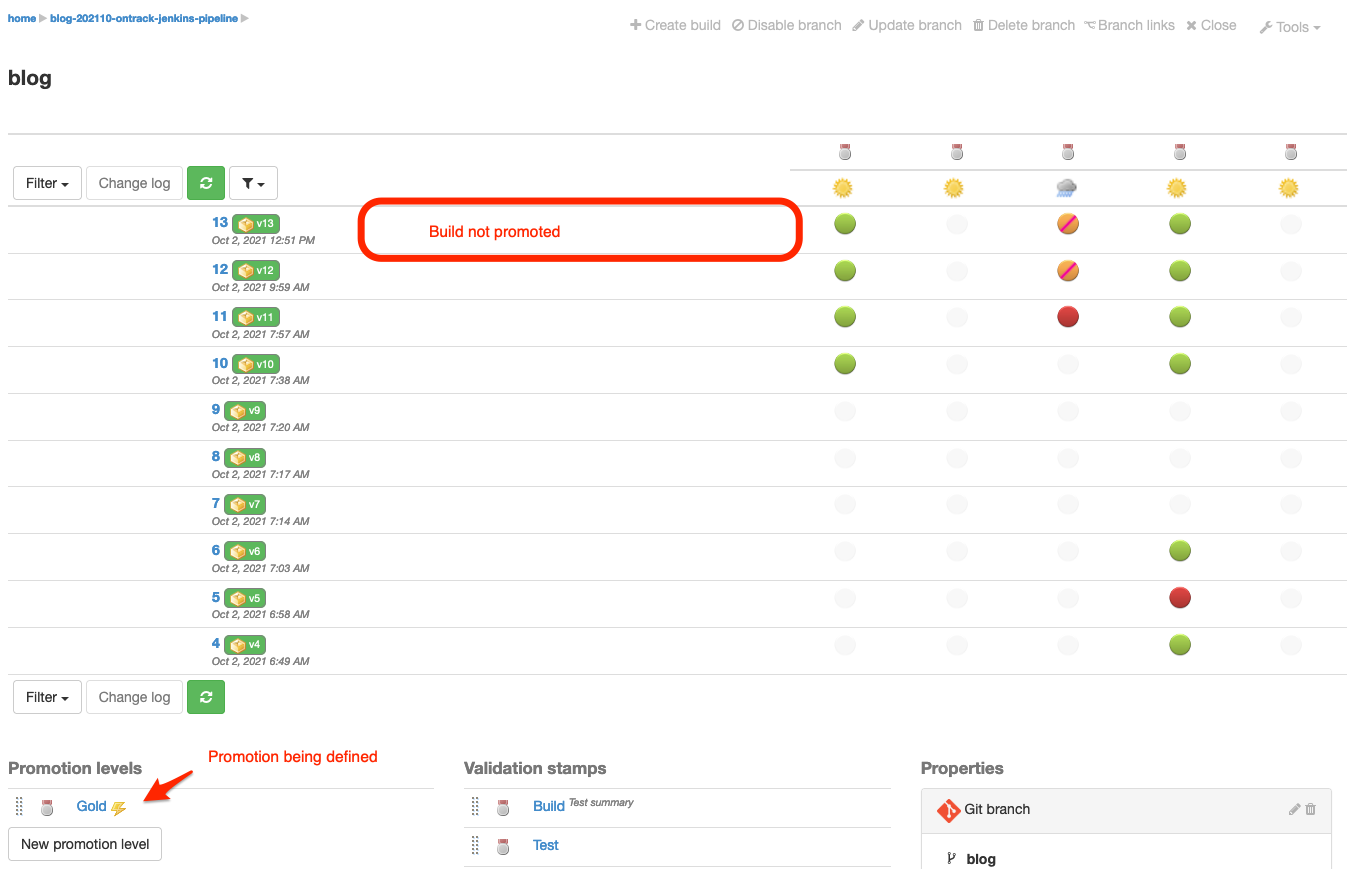
It's because the Scans validation is still marked as a warning. Let's change this:
ontrackCliValidateCHML(
stamp: 'Scans',
critical: 0,
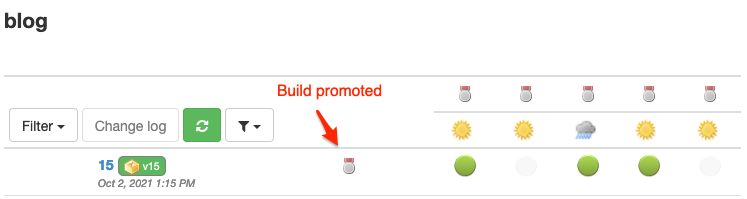
high: 0, // <-- Number of high severity issues set to 0
)Once the build has run, the Scans validation is now Passed and the Gold promotion has been granted 🎉
Conclusion
In this article, we've seen how to set up a Jenkins pipeline so that data is sent to Ontrack:
- the setup of the project and the branch
- the creation of a build with its release label property
- the setup of validation stamps & the creation of validation runs, optionally with some data
- the setup of auto promotions
These are the basic blocks used by Ontrack to build intelligence about your pipeline.
What's next? So many things, which I hopefully address in future articles: how to scale the validation stamps and the promotion levels, how to set images for these sad validation stamps we just created, how to get changelogs, how to link builds with each other, how to compute quality indicators for your portfolios of projects, etc.
Links
- Ontrack: http://nemerosa.github.io/ontrack/
- The Ontrack Jenkins pipeline library: https://github.com/nemerosa/ontrack-jenkins-cli-pipeline
- Setting up Ontrack with Jenkins: https://nemerosa.ghost.io/2021/08/28/basics-of-ontrack-with-jenkins/
Questions? Remarks?
Join the discussion on Gitter.